A Persona How-To
In this post we’ll look at how to create personas. We’ll be following Alan Cooper’s method, adapted from Goodwin’s Designing for the Digital Age. I was originally taught this approach by Lizz Bacon, who was one of Cooper’s original hires back in the day.
Step 1: Roles
The first step is to decide whom to interview. Goodwin recommends dividing users by role, with roles being defined largely by tasks, not job titles. People with the same job title can have very different roles, just as different job titles may perform the same role. Thus, personas and roles may or may not line up in the end.
A single role may contain several personas, or several roles may fall under the same persona. At the end of this step, you should have an idea of which users or interviewees fit which of your roles, determined by who does what and the types of tasks each user typically performs. The focus at this point is on the types of tasks and not how users perform them.
Step 2: Interviews
You’re gonna be conducting interviews, so you’ll need some questions. Some demographic and background information is good to get, but that’s not your primary focus. Your focus is identifying the main behaviors, responsibilities, needs, frustrations, and experience goals for each user type, and you can’t get such information from demographics. The meat and potatoes of the interview will be on understanding, in terms of needs, what differentiates one user type from another.
You’ll want enough questions to fill an hour-long interview, but this may not be as many as you might think. For instance, a single question, with the right prompting and redirecting from the facilitator, can easily keep someone talking for 10+ minutes. Example questions might include: “What aspects of your work do you find motivating?” “Could you briefly describe a typical workday?” “If you had a magic wand, what would you change to improve the way you get your work done?” “What are some of the main challenges and obstacles you regularly encounter in your work?”
Some questions will be more role specific. For instance, I was once doing personas focusing on use of reporting, so questions also explored things like target and goal setting and the creation of metrics. Once you have your interview script, go interview. You’ll be interviewing at least six users per role. Persona interviews can be supplemented with observational work, such as having users demonstrate certain tasks. It’s also a good idea to collect artifacts, such as common templates used, reports created, examples of common deliverables, and so forth. Remember, an artifact is always better than a description of an artifact.
Step 3: Variables
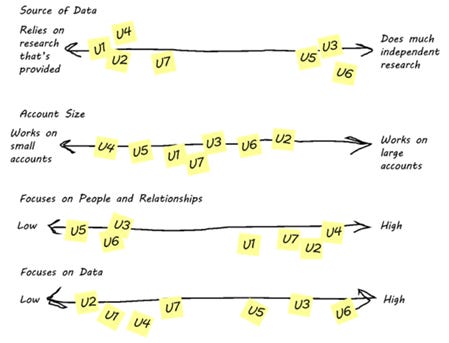
Now it’s time to start analyzing your data. This is done by generating a list of variables you’ll use to rate each user. These variables should capture the aspects of user behaviors and attitudes that they seem to differ on. Most of your variables should be expressed as a continuum. I’ve used horizontal lines with labeled anchors (endpoints) and also Likert-type scales. It doesn’t really matter which.
Some of your variables might be buckets and not continuums. Goodwin warns that if you have a lot of buckets, however, then you’re probably focusing too much on tool use and not actual user behavior. All in all, you should have about 20 variables. If you’re having trouble coming up with them, she advises, try to think of which two users differed the most. Pull up their responses and identify what, specifically, are the things that make them so different. These will be good things to capture as variables.
Some things it’s often important to capture include aspects of users’ mental models, goals (often expressed as buckets), tasks users perform, frequency of performing key tasks, quantity of data handled, attitudes, level of technology and/or domain expertise, and any demographic details that impact behavior. Be careful with this last one though. As noted above, including too many demographic details is a distraction. Age, seniority, and geography, as well as important differences in physical work environments may be pertinent.
Step 4: Ratings
You have your variables. Now it’s time to rate interviewees or users. This is done by mapping them onto your behavioral variables, either by using stickies on a wall or a virtual option like Mural or Miro. If you’re doing this collaboratively in a physical room, I’ve found this process can easily take up four conference room walls. Whether doing this collocated or virtually, you’ll create a sticky note for each user for each variable. In other words, if you have 16 variables and did 18 interviews total, then you’ll need 288 stickies (a sticky for U1, U2…U18, for each variable).
Everyone who participated in your user interviews should also participate in their analysis. The mapping of users onto variables can go two ways. You can either start by rating U1 (your first user or interviewee) on all of the variables or you can rate all the users on the first variable before moving on. The former lessens having to keep going through your notes but results in having to move lots of people later as you realize they’re not where you thought they’d be once compared to other users.
As you do the mapping, keep in mind the goal is to rate users relative to each other, not relative to some blanket notion of where they fall in the overall user population. Also, make sure you’re rating them based on your own conclusions and not according to their self-description. This is important for two reasons. First, self-report data is not always accurate. Second, they’re not actually describing themselves within the context of the comparisons you will be making. As an example, they may think they’re more expert at something than they really are when compared to the other users.
Refer to your notes to see if you agree with the ratings made by your collaborators. Encourage them to do the same. All of you need to agree on the placement of each user rating. Move them around. Discuss them. If all your stickies form one cluster on a variable or all fall in the same qualitative bucket, that means that variable is not helping to group your users. Get rid of it. At the end of this step you should have every user mapped to all your variables. Be sure to take pictures of your scales.
Step 5: Patterns
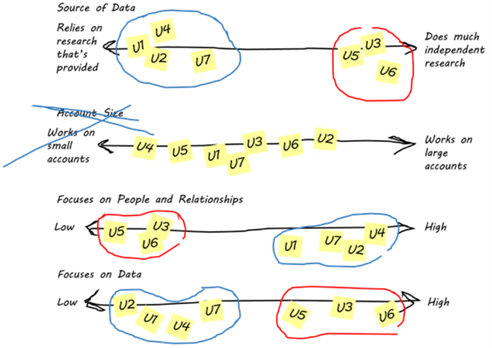
This is the fun part. Start by looking at combinations of two or more users across your variables. Goodwin advises that any users grouped together on more than 1/3 of the variables might represent a pattern. Circle any such grouping. Step back and look at the overall picture. Look for other interviewees that appear frequently with the ones that you’ve already circled. If other users seem to appear frequently within a circled group, erase and enlarge your circle to include them, thereby adding them to the cluster. Look at all the variables where these users are rated together.
Think about what the relationships between the variables might be. For example, in the picture above, it would be interesting that users who focus primarily on people and relationships are also not that focused on data and doing their own research. Though a made-up example, this is very similar to a real example from persona work I’ve done.
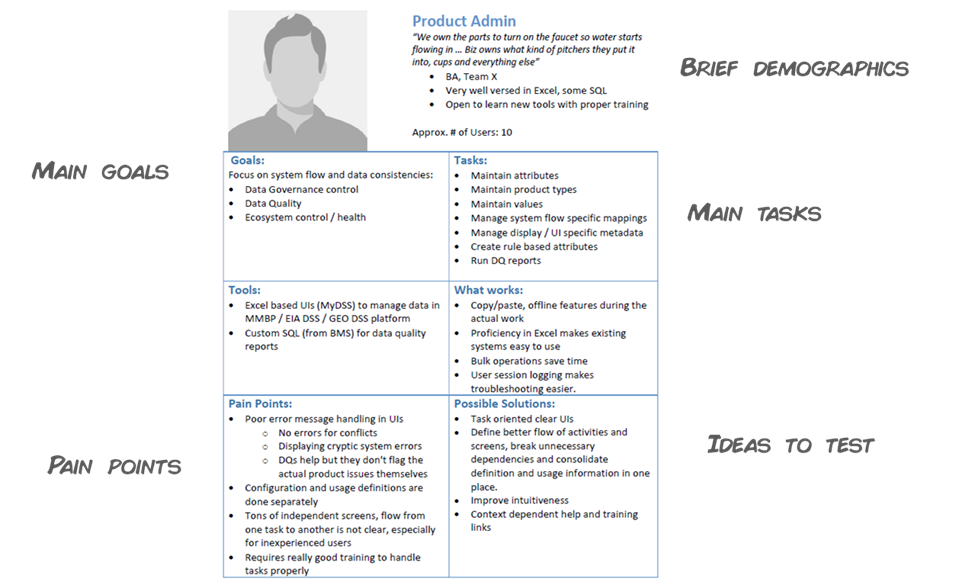
Once a consistent pattern emerges across the clusters, start looking at the variables involved to get a sense of the characteristics of the overall pattern. This is similar to naming factors in factor analysis. Why are the variables clustering together? Write down their underlying commonalities. This list of common characteristics is your first proto-persona for that group or cluster. Rinse and repeat with your other groups. If some users fit more than one emerging proto-persona, if they would be happy with a product provided to either, then they do not need their own unique persona.
At the end of this step, you should have a set of pattern descriptions, each with about a dozen defining characteristics. These are your proto-personas. Give each a temporary descriptive name, such as “The business liaison”, “The data guru”, etc.
Step 6: Goals
Start identifying goals for each of your proto-personas. The solution you develop should ultimately be driven by these goals. (That’s why Cooper’s method is called “Goal-Directed Design”.) As Goodwin points out, goals may become evident in the mapping process, but you’ll likely also have to go back to your interview notes to surface them. Look for information about user frustrations, behaviors, and desired experiences. Most completed personas have three or four goals—two or three end goals and at least one experience goal.
An end goal is something the product can help the persona accomplish, not something it can do for them. Keep in mind that any statement that specifies a mechanism, such as “Do X wirelessly”, is probably a task, not a goal. An experience goal describes how the persona wants to feel while using the product or service. All goals should be short. Try to word things the way the persona would really say them. At the end of this step you should have three or four memorable goals for each persona.
Step 7: Fleshing out
Here you clarify the distinctions between your proto-personas and flesh them out. Fleshing out your proto-personas and developing them into richer narratives is what makes them full-blown personas. As Goodwin stresses, this is important because the more distinct your personas the easier they will be to remember and use. Go back to your mappings and look for variables that weren’t critical to defining the patterns.
Goodwin advises that these “leftover” variables can help you add detail, making your personas more distinct. When you’ve gone through all the variables, go back to your notes for the users who contributed most heavily to each persona and use them to fill in more detail. Add a set of frustrations for each persona, as well as environment details that affect usage. You can increase the distinctiveness of your personas by adding some statement of skills, education, prior job, experience level, and a description of that persona’s feelings and aspirations.
It’s good to include some demographics such as age, gender, ethnicity, etc., for “flavor,” but, again, this should be kept to a minimum. Any demographics included need to be believable. Any part of a persona that doesn’t feel right will cause people to question the whole thing. So, for example, you wouldn’t want to make a persona a female if in fact most of the people in that role are male (or vice versa). Every user persona should also be accompanied by a “day in the life” description of current behaviors relevant to the design problem at hand.
You may need to consider whether all of your personas are in fact user personas. Not all personas necessarily are. You might have a customer persona, which represents people paying for a product or service but who are not necessarily going to directly use it. Though not a real user, they may still have needs to be met as the purchaser. You might also have a persona for people who are not direct users or customers but are still nevertheless impacted by the design and whose needs need to therefore be taken into consideration. This is called a “served persona”. Goodwin gives the example of a diagnostic decision aid: The physician using the aid would be the direct user; an elderly patient of the physician might be the served persona.
Both customer and served personas are shorter than user personas. They contain frustrations, concerns, and some demographic information, but do not need activity descriptions. There are also negative personas, which are akin to an anti-pattern. These represent users who designing for would actually harm the overall quality of your efforts. (For example, designing a system for “super users” typically has poor results.) These types of supplemental personas, however, are rarely needed.
Users who have clearly distinct tasks should have their own interface. These are your primary personas. In other words, if you designed a product solely for your primary personas, then the other personas should be mostly satisfied with the design. Initial design ideas then should be generated from the point of view of your primary personas. When in use, personas should be referred to as though they’re real people. You want people to get comfortable doing this.
If someone says, “Why are you against feature X?”, you should say, without batting an eye, “Because X is not what Jane needs”. To help people relate to your personas, the pictures used are also important. Keep in mind that the whole point is to get the development team to ingest and empathize with its user data and relate to it as though it was a real and living person. As stated above, any part of a persona that feels fake will cause people to doubt the rest of the persona. That includes the picture.
You want a picture of someone that looks like a genuine day-in-the-life snapshot. If looking at photos for a female persona, for example, the photos above left are better than the photos above right. You do not want something that looks staged, polished, and direct from marketing. In the end, you want something that teams are actually going to use, that resonates, and is helpful for them. If people aren’t going to tie design decisions back to the personas created, then there wasn’t much point in creating them!
Hope this was helpful.
Until next time.


