
Influence Mapping (Part 1)


In this three-part series we will go over my take on influence mapping. In this post, Part 1 of the series, we will look at some of the principles involved and explain how to create the map. In Part 2 we will cover how to work the influence map to evolve the decision landscape at play. In Part 3 we will bring it all back together, looking at examples and summarizing the principles.
Intro
In the 1964 presidential election Lyndon B. Johnson defeated Barry Goldwater by a historic 14 million votes. Some Goldwater supporters were so crestfallen that they left politics altogether, never to return. Others, such as political strategist Morton Blackwell, turned to digging into what exactly could have gone so wrong. In his piece, “The Real Nature of Politics”, Blackwell references Goldwater’s campaign slogan, “In your heart, you know he’s right.” (This was famously countered with, “In your guts, you know he’s nuts.”)
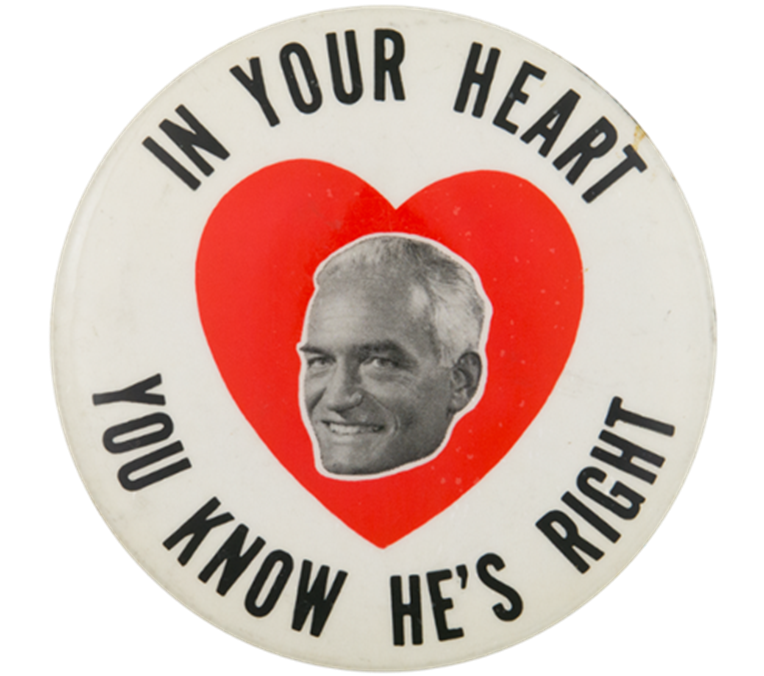
Goldwater’s slogan, Blackwell contends, assumed that you win over minds by having “better arguments”. In his article he describes this approach to influence as the “Sir Galahad Theory”, which is perhaps better described as a fallacy. The Sir Galahad Fallacy, then, is to assume that others will be influenced by your argument if you just make your case well enough. Unfortunately, that’s not how it works. Being right is not sufficient to persuade.
The reality is that facts do not influence; or, as narrative warfare theorist Ajit Maan puts it, raw data are not inherently influential. Data must be “storified” in a way that triggers people’s sense of self. This is true for a variety of reasons. It can be difficult even getting agreement on just what the “facts” are. When there is agreement on the facts, people still emotionally tag them in different ways, interpret them through different lenses, and then ground decisions in different underlying values. Inescapably, story is literally how we construct “meaning”. Even in peer-reviewed scientific publications, articles must shift from the presentation of data to the author’s interpretation—and that inevitably involves narrative. (Taking this deeper, one could point out that to even generate quantitative data one must first make a series of qualitative decisions.)
This leaves us with a reality where information isn’t conveyed as much as it is always interpreted and weighted in certain ways, filtered through a lens of social (indeed, almost tribal) dynamics. Trying to influence while ignoring such dynamics is a fool’s errand. To influence, then, you need to not only know your facts but, more importantly, you need to study influence itself. To quote Blackwell, “Being right in the sense of being correct is not sufficient to win….”
Moving to the opposite side of the political spectrum we find W. E. B. Du Bois: “…we hold the possible future in our hand but not by wish and will, only by thought, plan, knowledge, and organization” (italics added). Effective influence, this series will argue, has far less to do with “making your case” and more to do with politics, community organizing, and shared narrative building. An essential tool here is influence mapping (a.k.a., power mapping), which originates from the worlds of union and community organizing.
There are a variety of flavors of this tool out there. I originally learned a variant from Joel DeLuca’s excellent book, Political Savvy, which I then altered by pulling in additional ideas. The process here is divided into three parts, based on the phases of a chess game: the opening, middlegame, and endgame. It’s not a perfect analogy, but it works: The opening is for setting the stage. The middlegame is where most of the innovative play occurs. The endgame is about putting on the final touches.
Throughout, core principles will appear bolded. Let’s get started.

The Opening Game
Influence has to do with stories, relationships, and how information is emotionally tagged. There is a social dynamic to this as well. Yes, every decision has a decider (whom we will call the “D”), but around every D is what might be called a “decision environment”, a context or social milieu composed of certain information, assumptions, and key players or stakeholders. Thus, getting big things done requires organizing.
If this sounds scary, then rest easy: Influence is just conversations. That’s it. Consider these definitions, from negotiator Kwame Christian. A “negotiation” is just a conversation where someone wants something. A “conflict” is a conversation where there is a disagreement about something. A “difficult conversation” is just a conversation you’d rather not have. The bottom line, of course, is that they’re all just conversations.
Another thing about conversations: They happen between people, as in human beings. Sounds obvious, but remember, facts don’t influence people. Humans are inherently political animals. People have egos and self-esteem needs. They care about image and status. They often will not even entertain supporting a decision if they do not feel their position has been sufficiently heard and taken into account.
What you’re really doing here is community building, so do not try to influence alone. Do not treat negotiations as two-party affairs. Influence is a team sport. We are so used to functioning as teams for so many aspects of our work that it’s a bit surprising we still so often try to influence without help. This is misstep. The very process of creating an influence map helps prevent this. It forces you to think through who should really be having conversations with whom, and in what order, to have an optimal effect.

This will also improve your understanding of the issue you’re trying to solve, its larger context, and relation to other issues. As theorist bell hooks emphasized, we also too often treat learning as a solo, individualistic endeavor. This is another misstep. This makes you an echo chamber. You will likely be more defensive, more prone to debate, which tends to make both you and others more closed and uncurious. Group learning, where conversation with diverse participants takes center stage, is more open and democratic. This will help you fill in the gaps.
Laying different descriptions on things leads to new ways of seeing, which can expose alternative paths forward. Even hearing your own thinking summarized by multiple others will often lead you to reconsider things. As you work your influence map you are also investigating the issue, building a structure of shared knowledge, and growing a network geared toward action. To optimize your outcome then, don’t assume you already have all the answers. Stay curious. Keep a “beginner’s mind”. This is stressed in Zen, where there is the saying, “In the beginner’s mind, there are many possibilities. In the expert’s, there are few.”
Step 1: List the Key Players
An influence map is made relative to some decision. What is the decision you are trying to influence? Who has the authority to make this decision? This is the “D”. This will usually be an individual. If it appears to be a group, then treat the group’s key members as individual Ds. If you don’t know who the D is, finding out is your first goal. Once you do, mapping will help you to learn the D’s wider decision landscape. Even when you and the D already have a relationship, directly approaching them may not be the best approach to influence.
When you are unsure of the D’s stance on the matter, a better approach is more akin to political canvassing. Let’s say the D is John and you don’t think you should directly approach him. Start sketching the larger context around the two of you. You may not know all the names you need to know yet, and that’s fine. Just start sketching what you know and then add as you learn more. The example below borrows from a concept called “conflict mapping”, as shown in Goldman-Wetzler’s book, Optimal Outcomes.

This point cannot be stressed enough: The focus here is NOT to “get time with the D”; it’s to evolve the decision landscape around the D, whether you end up needing to meet with them or not. Throughout this whole process (and it is a process) it is vital that you focus on relationship and building connection. As stressed in Pfeffer’s 7 Rules of Power, this means you cannot just contact people you already have close ties to. In learning the lay of the land you’re also looking to bridge structural holes and grow a diverse influence network.
This requires you to pursue “weak ties”, meaning you will often be meeting with people you don’t know all that well. Think of it this way, if you just stay within your comfortable and familiar established network, then you aren’t really learning anything new and probably won’t be able to shift the decision landscape at play. In general, it is better to identify more people than necessary than to leave important players out of the picture. Start writing down names. As James T. Brown suggests in The Handbook of Program Management, it is often helpful to start looking for key stakeholders in the following places.

When you find out who the D is, try to learn how they tend to make decisions. Whom do they tend to listen to? Who has the D’s ear? Who is on the D’s team? Whom do you know who knows these other people? Borrowing a phrase from Alan Weiss, if the person you’re meeting with is functioning as a “gatekeeper” for the D, then how can you better influence the gatekeeper? Who else can be an alternative route to the D? Whether working individually or with a small group, asking and answering the questions below will help.

Note: This can be done with paper and pencil but is easier to do digitally. I personally use Excel for the spreadsheet and PowerPoint for the map. (If you’d like a copy of the templates shown here, complete with the icons ready to be dragged and dropped for the mapping, feel free to email me at charles.lambdin@gmail.com.)
Step 2: Cast the Key Players
At this point you should have a list of key players. In addition to the D, whom you identified above, you will now cast stakeholders as being either Coalition, Opposition, Coplayers, or Unknown. You may not know everyone’s role at this point, and that’s fine. It’s still important to just fill in what you think is the case. This information might change as you work your map—that just means you’re learning. For now, most people might even be Unknowns. That’s also fine. In general, just creating the map helps you work the map. The meetings you will schedule will iterate your map, filling in more data as you go.
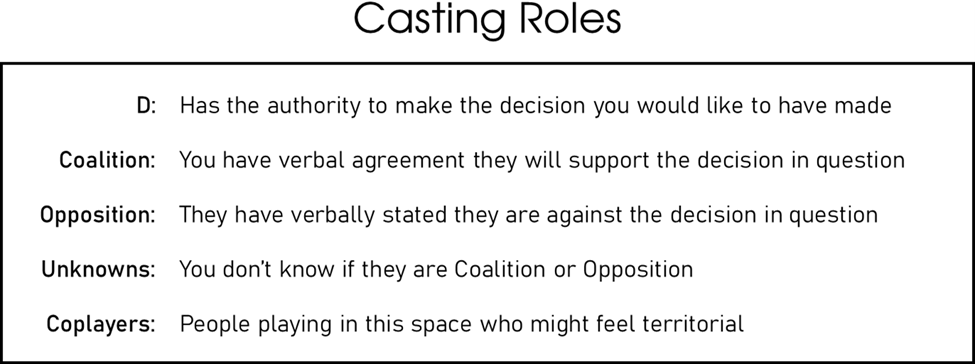
Whom do you already have a verbal commitment from that they support the decision in question? These people are Coalition. Anyone who has said they are against the decision is Opposition. Coplayers are anyone who might feel like you are stepping on their toes, people who might already feel like they “own” this issue. If you do not align with them, gain their blessing, and pull them in, they might try to roadblock or thwart your efforts.
Step 3: Rate Levels of Support and Influence
Here you will rate your key players on two variables. The first is their level of support for the decision in question. This is your best guess, based on your current gut feeling. Second is their overall level of org influence, also your best guess. Go ahead and include yourself in this as well. Some approaches to influence mapping place “You” at the center of the map. Not this one. Go ahead and rate yourself. Hopefully you are in favor of the decision you would like to have made 😊. Your level of org influence, however, is likely lower than the D (or you probably would not be doing this). This means you will typically be on the lower righthand side of the map. The scales to use are explained in the spreadsheet shown below.
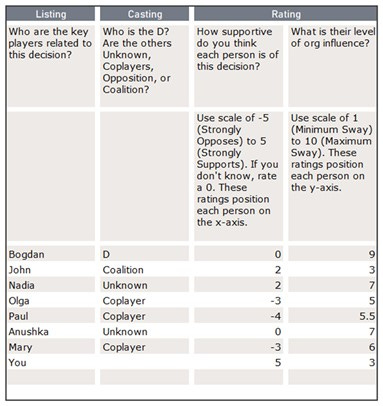
Once you’ve done your listing, casting, and rating, then you can create your first map. The legend below shows the symbols that represent the casting on the map.

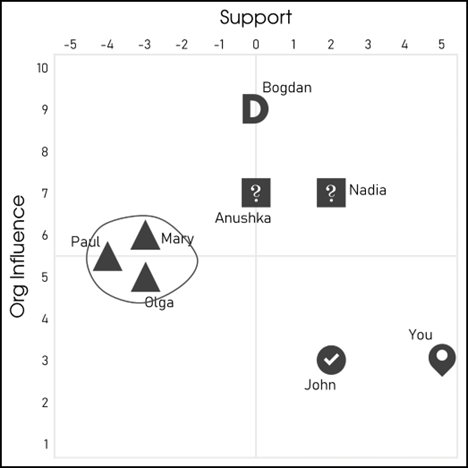
Use your ratings to position each stakeholder on the matrix. The level of support is plotted on the x-axis. Level of org influence is on the y-axis. In the present example we have the D, one Coalition, two Unknowns, three Coplayers, and You. Using the casting and ratings depicted in the spreadsheet above, the initial map would look like the image below.
Step 4: Add Relationships and Permission
Now it’s time to add the relationships of interest between the key players. Here you will use arrows to depict who is influencing whom. Next rate the “permission” of each relationship, a concept from Michael Grinder. Permission is one person’s level of receptivity to another’s influence. This is not the same thing as rapport. You might have great rapport with someone who still isn’t open to hearing from you on a particular topic, and this can be true for a variety of reasons. Maybe they don’t see you as credible on this specific subject. Maybe your role is too different from theirs. Maybe your pay grade is too different from theirs. Whatever the reason, while establishing rapport can make a difference, it’s not sufficient to influence. (In fact, it’s not always necessary either.)
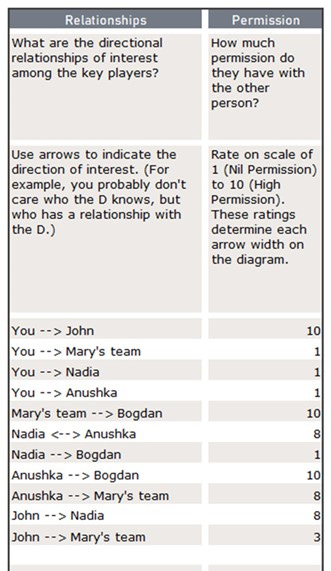
When added to the map, the arrows build out the possible influence paths from you to the D. Your permission ratings are represented by the thickness of the relationship arrow. If using PowerPoint, each rating becomes the literal width of that line. For example, a relationship with a permission rating of 7 is now a line with a width of 7 pts. (Neat, huh?) Adding this new data, you now have a complete influence map:
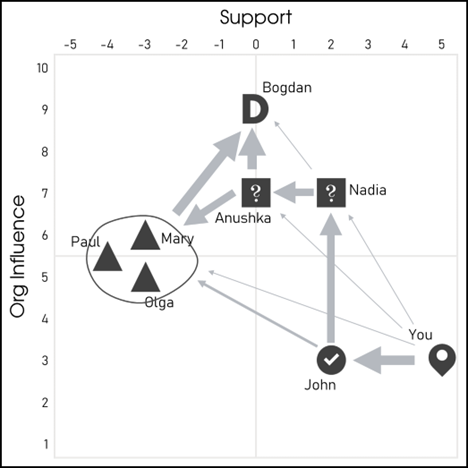
Just glancing at this, a few things are suggested that may have not been readily apparent before. This will enable you to reveal and leverage the dynamics already at play.
Diving in, however, brings us to….

…as in, to be continued in Part 2.